Friday, September 6, 2013

THE SONG REMAINS THE SAME...

This week all I did was the same as last time -chisel, plane and sand, this time on the second piece of wood....pics to follow next time


These tiny planes reminded me of this song for         some reason best known to my head..it is still relevant


Monday, August 19, 2013

THE JOY OF CHISELLING...

Whilst last weeks work was all about man and machine (i.e. the thicknesser) this week was all about tools.  The chisel as an extension of the hand... or the plane or the humble, but essential, square of sandpaper. In this case I used 120 grade paper (that red stuff in my hand below right, note trendy 1970s rock icon T shirt)

With both pieces of mahogany (top n base) contoured as per last weeks pictures, this week was all about curvature, taking away those sharp edges and creating a smooth finish.


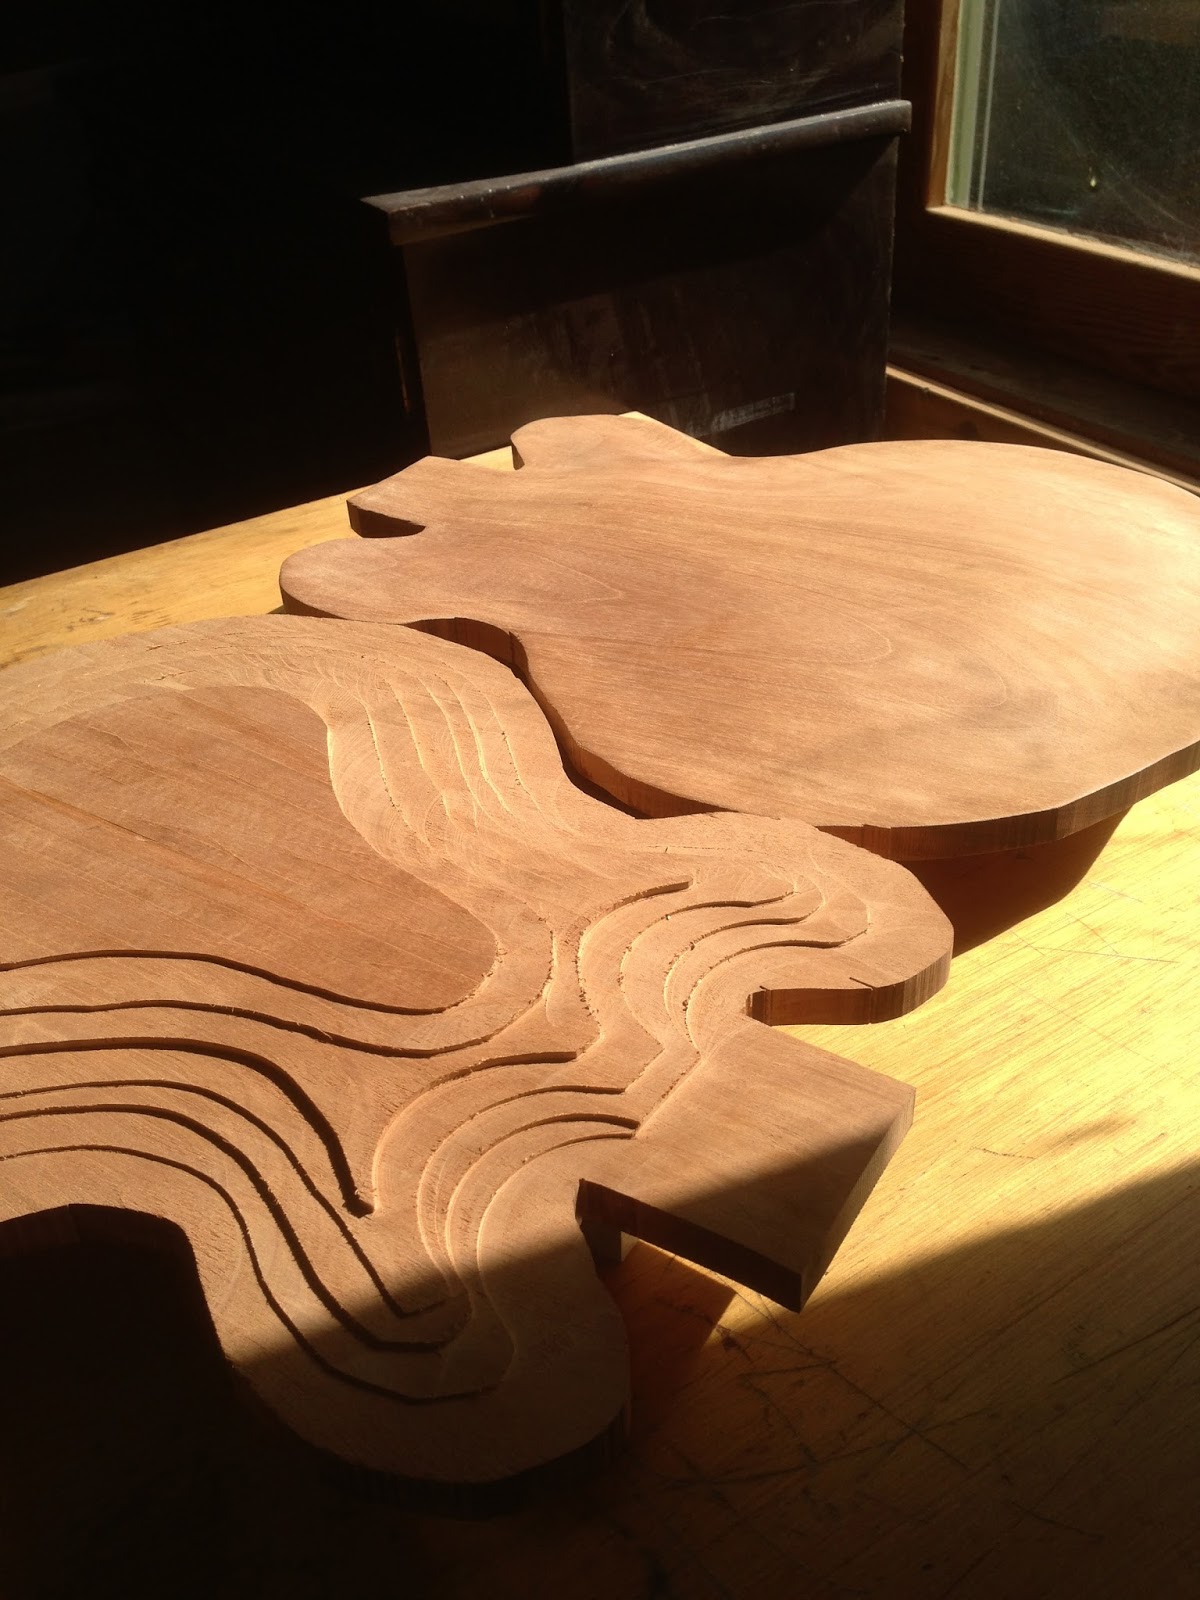
Initially I used the paring chisel in the picture which took away the sharp edge. Then that tiny and pretty cool plane to even out those curves a little more. A scraper helped out at that stage. Lastly a grade 180 sandpaper to end up with that neat shape. I still think it's a little too high...what dya reckon??


The art of using the chisel seems to have  a therapeutic benefit.  Lotsa men (maybe women too) love to work with wood and chiselling is often a centre piece of this labour...remember whittling anyone?  It can help hat ease the troubled mind,  a little like the way meditation can. Chisel on I say.


This weeks song considerations included "Enter Sandman" (far too up itself for it's own good really) anything by Level 42 (err?!? nothing by Level 42) Really tho' it had to be these iconic Aussie pub rockers..we all know their catalogue (well the readers from down under anyway) ...so here is their last single with Jimmy only kinda screaming (!) It's a good comment on the Aus/UK/Everywhere Idol/ Who's Got Talent etc crap shows that now seem to shape the music industry.  Sadly they break a guitar in the video:  see John Hiatt  at the end of my second post.


Friday, August 9, 2013


IN THICKNESS AND IN HEALTH...

Today was spent primarily shaping the contours on the both the base
 (finishing from last week) and the top of this "Gibson semi solid to be".


Here we see the "Before" "During" and "After" views. What could be so good as working on a "potential guitar", in the sun, on a machine with ne'er a care in the world.  Well lotsa things, I guess but this was a damn good day at the office. The machine in use shall hence forth be known as the Thicknesser.  The guy next door from the battery world shop decided it would be so. It's a variation on the one in the link but the principle is there. Later I used the thicknesser/planer shown in the link to help smooth the pieces of wood attached to the top'n'back (see above left.. the white piece on the guitar shaped bit!!). These pieces of "thicknessed" i.e. levelled wood will help secure the guitar for the chiselling to come. Stay tuned groupies!


Given the nature of todays work a link to "Tales from the Topographic Oceans "  by Yes seemed an obvious choice but hey its a triple album of prog. rock... read the link!!!  The following piece of music is still from Yes, though a solo piece from the far superior and much shorter "Fragile" LP.  There are a few versions around but the studio one is still the definitive version, and hey look at that Roger Dean art. ...Isn't this reason enough to practise your chord changes and fingering: 


Friday, August 2, 2013

NEXT STAGE...

After cutting the shapes and pasting them onto craft wood, the bandsaw again comes into it's own.  The craft wood is much easier to cut compared to the mahogany, and all digits remain intact.  I counted,  still got ten, and of course the absence of claret is also a good indicator of a safe outcome.


These cut outs help shape the back and front of the guitar.  The height of both sides is 11mms at the centre and then they slope off, at  rate of 1.83333mms per contour (those 6 shapes I cut).   Back to the mahogany: it will be shaped according  to the contours and measurements (refer to advanced calculations pictured,traditional approach of pen on paper but checked on mobile phone!) I did refer to the plan.

The shaped craft wood is screwed onto the mahogany, one piece at the time, starting with the smallest, to allow the real guitar shape to be gouged out.  The machine in the picture, being used by Strato, is a custom built thing of infinite use, but without a name. It helps me end up with the shape in the last pic (that's the base, phase two of six).  Four more levels on the base, the full six on the top and then: let the chiselling begin!!!


No reason to post this 'cept it's a great song, even if the band has a crappy name. Enjoy,  catch you next time.


Wednesday, July 31, 2013


MAKING SHAPES...

After a months leave I returned to the workshop in Toronto NSW on Friday July 26th. Todays plan includes shaping the wood into something resembling a guitar.  I have already cut the shape of the guitar from the plan and glued it onto some craft wood.  Now I use a pen, inside a washer, to go round the outside of the shape drawing it onto the mahogany. This allows room for error,shaping and whatever else may go awry in the future
Using this line as a guide I then cut both pieces of mahogany into a shape vaguely resembling a Gibson hollow body guitar.

Using the bandsaw on the thick mahogany is far more challenging and especially difficult in those areas the will attach the body of the guitar to the neck. Truth be told I nearly broke the saw 'cept for the interventions of Strato the luthier.  Next I pick what will be the top and back of the guitar. I select the sides of the pieces that basically are most pleasing to the eye, and show the least amount of flaws in the wood.  The two opposite sides are then planed to allow them to lie flat against each other.  Much of the inside of these will be gouged out to make way for electrics etc. (a bit away as yet).


Now we get back to the plans and trace over each of the contours on separate pieces of tracing paper. This is  good fun, I like to draw/trace. Each piece of paper will help develop a 3d shape to help refine the top of the guitar...but hey thats next week.
I was tempted(only very briefly, mind you) to include the 
1960's hit "Bend me Shape me" here.  Then I considered something by Harry Chapin (oops!)
 "Heart Shaped Box" anyone?
I really would have liked to patch a video of "The Shape of Jazz to Come"
 (Ornette Coleman) but lets face who's gonna sit thru
 a full album in these hectic times??? and it's modern jazz!
It had to be the following from the Last Waltz: Great movie, even better band, 
inventors of Americana, Listen, Enjoy.


Sunday, June 23, 2013

MAKING PLANS...

Sometimes the best laid plans aren't all that great really. I got plans for the Gibson ES335 via e bay and they seemed fine to the naked untrained eye (i.e.: me). On closer examination there were some big omissions. In particular the contours for the sound board were not recorded, so shaping the top of the guitar would be hard, if not impossible, unless I left it flat (not an option).
Also the thing looked bloody huge on the plans. After some guidance from my tutor and getting a copy of a set of plans for a cs356 Gibson (above right, thanks Strato & James)  I made some adjustments to the original outline. 
The new more compact shape was cut out on a bandsaw and is shown above.

Next up was the task of planing the joined pieces of mahogany to get a level surface to shape into the cs356.  Incidentally the wood is Malaysian in origin but the original genus is from Honduras. Most of the mahogany imported to the USA now is from Peru and up to 75% is illegally harvested. Brazil put an embargo on mahogany harvesting many years ago and the illegal harvesting is now mainly in Peru.

Planing has a kinda "zen-like" quality to it and is a guilty pleasure I would highly recommend to everyone .The red gold (i.e. Mahogany) is now flat(ish)and ready to shape. 

I spent the rest of the day improving the action on my old guitar and restringing it.  Plays as sweet as a bird now.  This student is on leave for a month and I leave you with the video below. The drummer now lives in Redhead NSW. The group are essentially defunct but left a great legacy of which this is but one small piece.  Enjoy!


Sunday, June 16, 2013

FIRST STEPS

Well, after some delay and consideration on my behalf,  a few decisions have been made and work officially started on Friday last, June 14th. The wood choice ended up as Mahogany from South America.  Australian Red Cedar and Spruce were considered but I am told the Mahogany is the best available, easy to use and should look awesome. All I know about wood is that it grows on trees so who am I to decline the advice. The first picture shows the wood which was originally a block but is now cut into four pieces. The plans (bought from e-bay - $16 ) sit in front


The body shape, as outlined on the plan, is affixed to a piece of craft wood and shaped out with the help of a bandsaw ( check out the second pic above) The plan is to cut the mahogany into that shape but first a few other steps. The wood i.e the mahogany, is in four pieces needs to be joined so a guitar shape can be arrived at. The wood is glued using a bookmatching system so each piece mirrors the other, which gives the appearance of an open book. Check out any, or at least most guitars you will see this on the front or back. Many other pieces of woodwork/furniture will display this too.


Clamps hold the pieces together in the pic above.  It needs a while to dry and gel so this is all for today.
What I learned today was a return to basic art of using a saw: use your thumb knuckle to maintain the starting place of cutting, by placing it next to the saw edge at the cutting point. When holding the saw handle extend for first finger to secure the direction of the saw!

In the mean time heres John Hiatt:


Sunday, March 24, 2013

WELCOME...

This blog is aimed at recording my experiences making a guitar. I have previously made one acoustic guitar based on the dreadnought style. The body type was pioneered by the C F Martin company and is now a common guitar body style.  I picked the dreadnought style as I arrived in class with no idea of what I wanted to make. The luthier suggested the style and it seemed like a good idea at the time. It was! The finished guitar works well but as all players know it's not the guitar, but the man behind the guitar. Eugene Hideaway Bridges told me that, one Sunday afternoon at the Premier Hotel in Newcastle. Hey its a perfectly good guitar, no comments required on the man behind it!.


The title is inspired (well, directly lifted from ) the Durutti Column album of the same name released in 1987.  However the focus is on the process of making a guitar and my experiences during that time. Vini Reilly, the man who is the Durutti Column, isn't really associated with the dreadnought guitar or the proposed "follow up " but he's a great player and its a cool name for a blog.  Thanks Vini.


The goal is to finish up with Gibson ES 335 style hollow body guitar. This was the worlds first commercial arch top semi electric acoustic guitar. It has two violin style F holes. I picked it really 'coz I just liked the look of the guitar and the way it sounded when my son played his.  I am making the guitar at the Australian Guitar Making School based in Toronto in NSW.


From the second week of April, when I start the project, this will be a weekly blog. I build every Friday! I should issue a few disclaimers here: I am a very scratchy player, you may not be able to make your own guitar based on my ramblings, sometimes I may rant on a bit other times I will be brief.  Who knows ?  However I'd love to hear your comments: Be gentle, keep it clean and rock on